 Login
Login Register
 Contact
Mixins allow you to add functionality to your project as an independent model. A mixin is a standalone project, but, when it is added to your working model as a mixin, all of its component files can be referenced and used within your model. When developing your own projects, mixins are a good way to separate independent, reusable functionality. If there is a large piece of code in your project that references only itself, then it sometimes makes sense to develop it as a separate model. This allows the code to be mixed into multiple projects and kept up to date without any code duplication.
This article will assume you are working with a project that already has mixins and you wish to make changes to the mixed in model. The mixin model exists as a separate project that you can edit and push changes for. While developing this model, you may want to test the changes you have made by mixing your edited model into the parent project. This is a simple process that can be used to test locally and be deployed to remote testing environments.
First, check out the mixin project in question. Once you have it open in NexJ Studio, there are two ways to use your version of the model as a mixin for the parent project: a fuzzy/folder mixin and a published JAR mixin.
Fuzzy/folder mixin
Use this method to test your model changes locally. Any change you make in the mixin model is immediately reflected in the parent project. This is done by pointing the parent project to use your mixin model’s workspace folder.
- Navigate to the Model Library, open your parent project’s Properties dialog, and open the Edit Mixin Models dialog. On the right are the models currently mixed into your project, on the left are the models available to add.
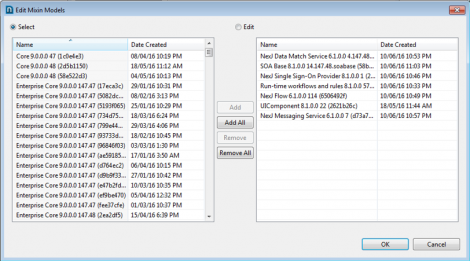
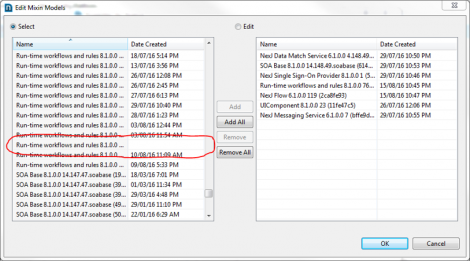
- To replace a mixed in model with the version currently in your Studio, select that model from the list on the right and click Remove.In the list on the left, find the entry matching your model name, with a blank Date Created field and the word **folder** instead of a checksum in the model name. Click Add.
- In the list on the left, find the entry matching your model name, with a blank Date Created field and the word **folder** instead of a checksum in the model name. Click Add.
- Click OK on the Edit Mixin Models dialog, and then on the project’s Properties dialog. You are now ready to develop.
Any changes you make in the mixin project will be reflected in the parent project any time you restart your server or hot swap changes.
You do not need to point your working model to the mixin folder again, as long as you do not change the mixin model version number. Every time you change the mixin model version number, repeat these steps.
Published JAR Mixins
When you wish to deploy your model, you cannot use fuzzy/folder mixins. Instead, you must publish your mixin model and mix the published JAR file into the parent model.
- Publish your mixin model project.
- Navigate to the Edit Mixin Models dialog for your parent project (as seen in the above instructions) and remove the current mixin model.
- In the list on the left, find the version of your mixin model you just published and add it to the parent project. You can find it based on the date and time it was published and by its checksum. In a typical setup, your Studio should publish to c:\work\publish and will automatically add your published JAR to the list on the left.
- Click OK on the Edit Mixin Models dialog, and then on the project’s Properties Deploy the parent project as normal.
Troubleshooting
When dealing with a project that has multiple mixins, ensure that the mixins are internally consistent across all projects. Consider the following scenario:
| Project | Mixins |
| A | B, C |
| B | C |
| C |
If you have made changes to Project C and wish to include them in Project A, there are a few additional steps beyond just mixing Project C into Project A. Using one of the two methods outlined in this article, mix your local version of Project C into both Project A and Project B. Then mix the updated version of Project B into Project A as well.