 Login
Login Register
 Contact
Filed under: Best Practices, Core Updates
Comments: None
Recently a question came up on the best way to read from one table, make some changes to the data, then write to another table. This is a great opportunity for me to shed a bit of light on how ETL Activities work. My example is a simple one. For more complex examples, just look at some of the ETL Activities in finance.
Background on ETL Activities
ETL Activities move pages of data from one place to another. They typically have an input, transformation steps, and output. They are done within Pipelines which can contain Forks and Joins for parallel processing (this is planned to support true multi-threading in Ruby).
Steps available outside pipelines
Steps available outside of pipelines can be used for initialization and finalization such as:
- Try/Catch/Finally – for error handling
- Copy Table – Duplicates a specific table with a new name
- Log – Create a log entry
- Script – Provides the ability to run script
- Truncate Table – Truncates a specified database table
- Steps available inside pipelines
Inputs – where the data comes from
- Class Read – Reads instances from the business model
- Aggregate Class Read – Reads and aggregates data from the business model
- Message Read – Reads messages from a message structure or message stream
Steps – operations on the data in-flight
- Conditional Splits – Routes and splits the data into two possible streams based on a specific condition
- Log – Create a log entry
- Merge Join – Merges two data streams into one
- Multicast – Duplicates data out to two streams
- Rollup – Aggregates rows from an ordered input stream
- Script – Provides the ability to run script and manipulate individual records
- Transform – Transforms data records using a specific transformation
- Union All – Union multiple streams into one
Outputs – where data goes
- Class Create – Creates new class instances persists them
- Class Upsert – Update an existing class instance or creates a new one from the data that you are processing
- Class Delete – Deletes specified class instances
- Channel Write – Outputs the stream to a specified integration channel
- Write File – Outputs the stream to a file on disk with a specified formatter (fixed width, CSV, etc.)
- Discard – takes in the stream and does nothing. Used mostly for development and debugging. Really handy
The Simple Demo (let’s load some data)
Important: If you follow along, only do this in a local test environment. I will be working with the Finance model and truncating the information in the NJAccount table.
In this simple demo, I’m going to truncate all of the Account records then repopulate it from my source after some small manipulations to the data. To make setup simple, I’ll use existing tables and classes. I’ll be reading all of the UserPerson instances, transforming them into Account instances (one new account per person), then writing them to the Account class.
To begin, lets create our ETL Activity. In the Persistence/ETL Activities tab RMB and select New ETL Activity. Name the activity LoadAccounts.
Select a Truncate Table step and place it on the flow line in the diagram. Double-click on it and in the Property Editor set the Data Source to “DefaultRelationalDatabase” and the Table to “”Account”. The persistence adapter will take care of mapping the logical table name “Account” to the appropriate table name in the actual back-end.
Select a Pipeline from the Flow section of the palette and place it on the flow line.
Place a Class Read from the Inputs section of the palette in the pipeline. You may have to resize the pipeline to see it. Set the Class Reads properties as follows. Class: UserPerson, Batch Size: 20, Output Attributes: ‘(lastName :oid) – note this is WAY easier in Jade as there is support for pickers and the ETL Editor is a lot smarter with it’s defaults.
From the Steps section, add a Log step and set its Level property to Info, its Batch Id property to “batch is: {0}”, and its Batch Args property to batch.
From the Outputs section add a Discard step.
Connect all your steps with the Connector from the Flow section.
It should look something like this:

You can run this from a console using the following script.
|
1 2 |
(SysETLActivity'invoke "LoadAccounts" () ()) (commit) |
In your log you will see something like…
|
1 2 3 4 5 6 7 8 9 |
-- Retrieved 20 instance(s) of UserPerson from 21 record(s) in 1 ms - [nexj.core.persistence.sql.SQLAdapter] -- batch is: [Instance<UserPerson, OID:1:V32:62CE8EFDA61F45F7B0BEFA992B82... -- Retrieved 20 instance(s) of UserPerson in 0 ms - [nexj.core.persistence.sql.SQLAdapter] -- batch is: [Instance<UserPerson, OID:1:V32:C1ECBAB4F1ED4A05BE9002FED9B... -- Retrieved 20 instance(s) of UserPerson in 0 ms - [nexj.core.persistence.sql.SQLAdapter] -- batch is: [Instance<UserPerson, OID:1:V32:D69AC4D3D5414FEC9614E1309380E... -- Retrieved 14 instance(s) of UserPerson in 1 ms - [nexj.core.persistence.sql.SQLAdapter] -- batch is: [Instance<UserPerson, OID:1:V32:2F53385AAF504FB89949A7809D6C -- batch is: [] - [nexj.model.etl.LoadAccounts] |
As you can see, the log step logs at the batch level – not for the individual record.
Now lets add in our transformation and output step.
In the Integration/Transformations tab RMB and select New Transformation. Name the transformation UserPersonXAccount. On the overview tab, set the following properties – Source=class:UserPerson, Destination=class:Account. In the Diagram tab map the UserPerson lastName to the Account name, and the UserPerson :oid to the Account primaryOwner :oid. (note: you can test your transformation, if it is more complex, independently in script using the (transform-message function)
Back in the LoadAccounts ETL Activity add a Transformation step after your log step, and use the connector to hook them up in order. Set its Transformation property to “UserPersonXAccount” and set the Output Attributes property to ‘(name primaryOwner). If you place a Log step after your transformation you will see the transformed batches when you run the ETL.
Finally, replace the Discard step with a Class Create step and set the following properties – Class=Account, Output Attributes='(name primaryOwner), Eventless=false. You unckeck the Eventless property because you want the business model to take care of all of the business logic around the Account class like defaulting and validation. You load classes in an Eventless way when you are defaulting all of the required attributes yourself for efficiency. Your ETL should now look something like…
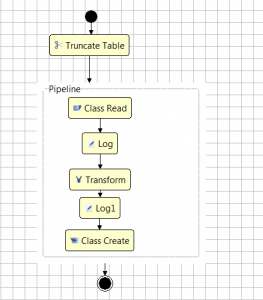
You are done! Restart your server console, and run your work with (SysETLActivity’invoke “LoadAccounts” () ()) (commit). Look in the database and you should see new account records in the NJAccount table.
Script steps
So just a bit more… If you want to see how a script statement works. Add a Script step and hook it up after your Transformation and before your Log1 step. Set the following properties – Output Attributes='(name primaryOwner). Set the script tab to:
|
1 2 |
(record'name (string-append (record'name) "1")) record ; return the record |
Note that you need to return the record from the script step after manipulating it. If you just set the name property on the record, that would return a string and the whole thing would have a problem. So always remember to return the record.
Also, this simple manipulation could have been done in the transformation, but we used a script to do it here to illustrate how it works.
Wrapup
I hope this simple example made more clear what ETL Activities are. Here we read from one class and wrote to another. ETL Activities can also:
- be used with messages, both in and out
- support some parallel processing and multi-threading (more to come in Ruby)
- used alongside Integration Services for complex processing scenarios with queues
- much more
We will post more examples in the future. Stay tuned.
Ed